
UPDATE! You can now register your interest for your very own cheese advent calendar in 2017! Head over to cheeseadventcalendar.com to sign up!
Cheese. I love it. I’d go as far as saying I love it more than chocolate, so why then has no one invented a CHEESE ADVENT CALENDAR?
You think this would be something that retailers had sold many times before. Something the likes of Babybel or Laughing Cow had jumped on for a Christmassy marketing gimmick – but no. I searched high and low to no avail. Upon Googling it, I did however come across lots of people asking the same question I had. Why?
Why o’ why is there not a cheese advent calendar available to buy?
You can get one for perfumes, for lipsticks, for chocolate, even for pet treats. Twitter it seems was full of outrage and confusion like me:

So this year, I set myself a challenge – to make Christmas 2015 as cheesy as possible, and if larger cheese companies weren’t going to solve the problem, I decided to take matters into my own hands. I made my own!
Follow these simple DIY steps to make an incredible gift for yourself or for the cheese lover in your life.
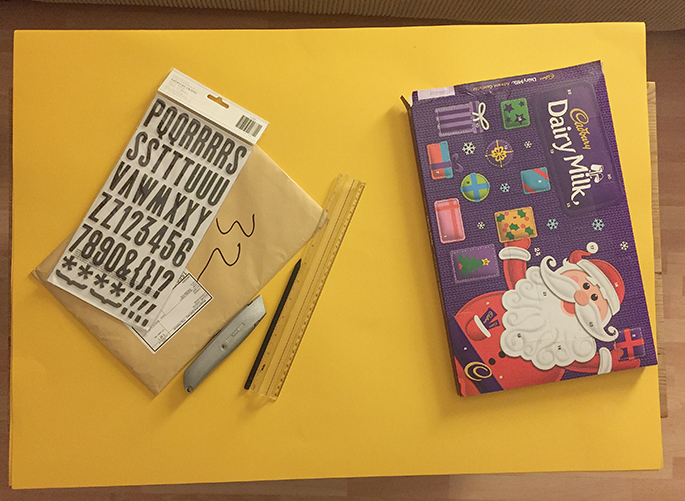
You will need:
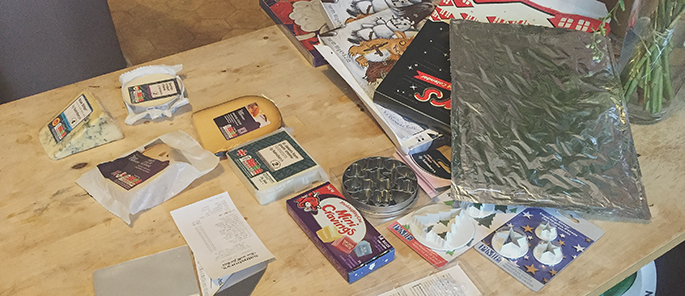
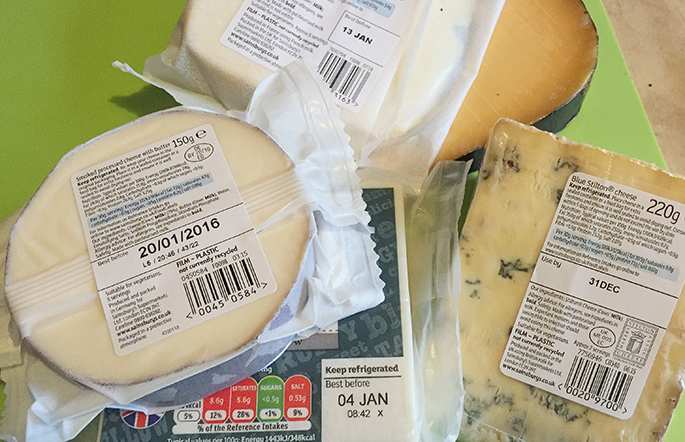
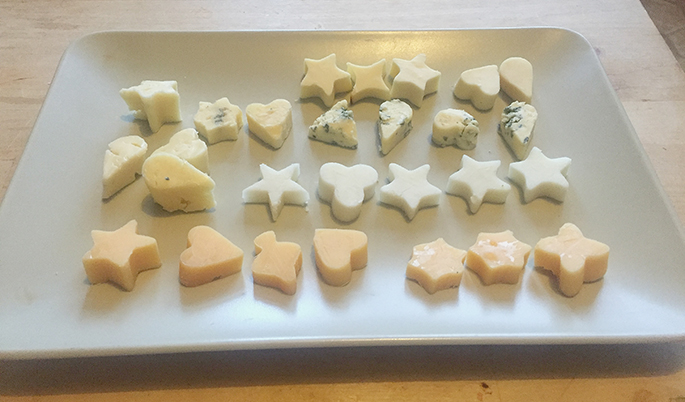
- Different kinds of cheese of course! I went for a selection of Sainsbury’s best. Vintage Gouda, St. Helen’s Farm Goats’ Cheese, Blue Stilton, German Smoked Cheese and French Doux De Montagne.
- A standard chocolate advent calendar where the plastic inside casing is large and deep enough. We tried a couple and thought the Dairy Milk one by Cadbury’s was the best
- Card, to re-create the box!
- Glue/Sellotape
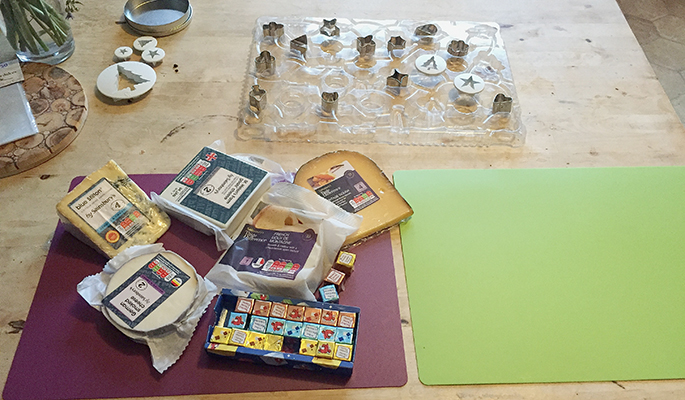
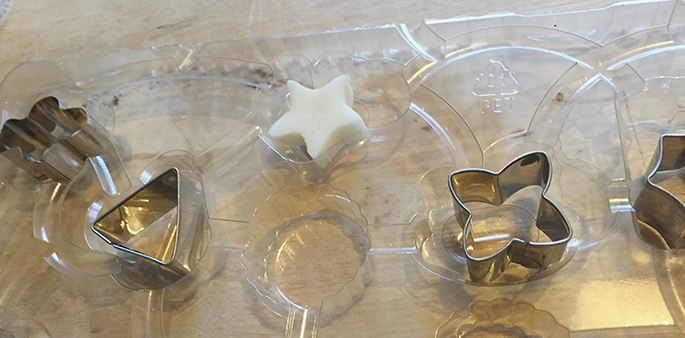
- Mini cookie cutters (I got mine from Sainsbury’s for £3!)
- Pens/stickers and whatever else you’d like to decorate yours with
- Stanley knife
- Chopping board so you don’t damage any surfaces using the stanley knife (safety first kids).
- Cling film
Making the cheese treats
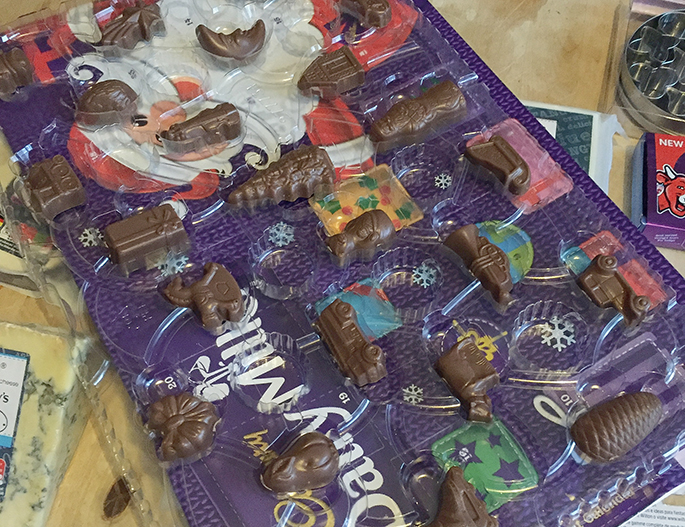
We begin by opening up the top of the chosen advent calendar and popping out the tray of chocolates, like cocoa flavoured ice cubes.
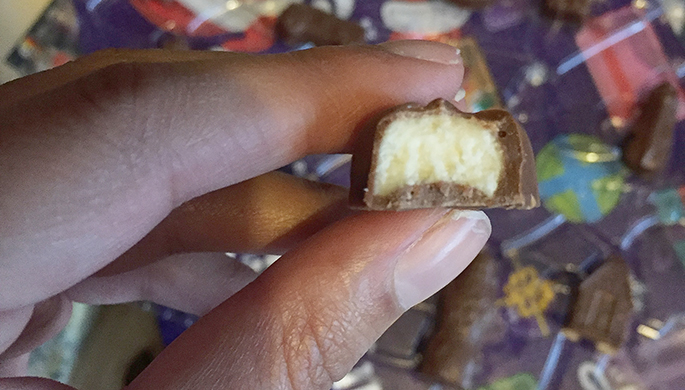
Luckily for me, these chocolate turned out to be amazingly good, and now I’ve got 24 days worth to get through – plus all the chocolate from the other unused advent calendars. Gaaaaah!
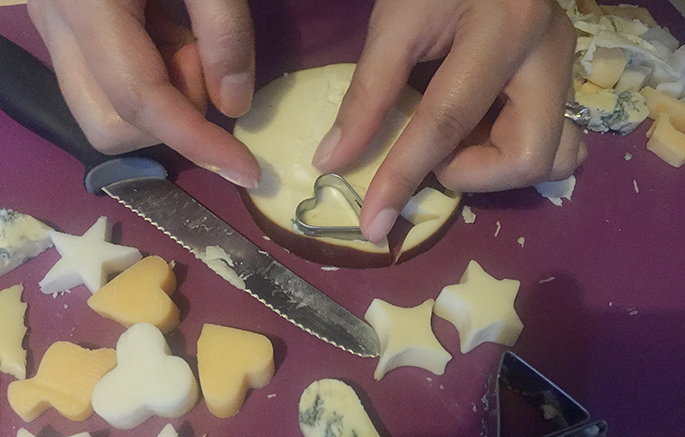
Start by testing out which cookie cutters fit in which mold, and so you can gauge how thick the cheese should be cut for a perfect fit.

Now, how do you get cheese to stay fresh for a whole month? Well, the first thing to note is that this is obviously going to have to be an advent calendar that lives in the fridge. There are no two ways about it. Fresh cheese = fridge.
The second, make sure you choose cheese that has a long best before date. All the cheeses I purchased would not be going off till way past the 24th December.

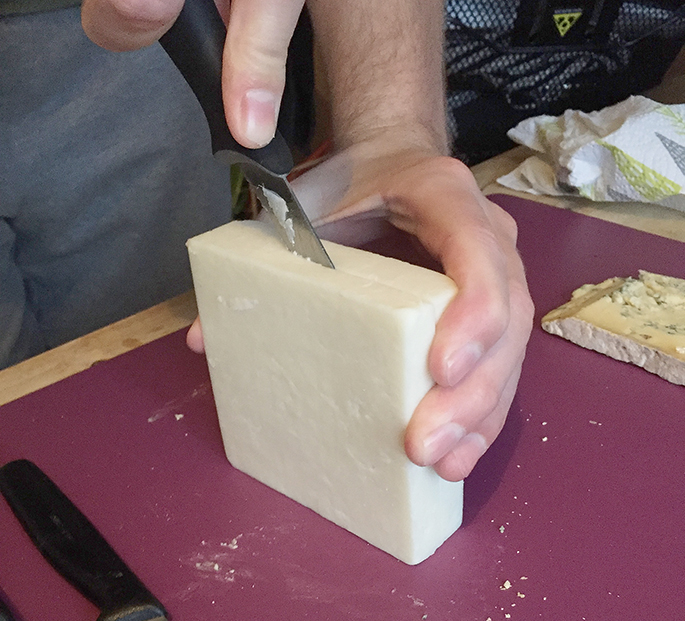
Slice the cheese into the desired depth and so that it’s flat and even in size.
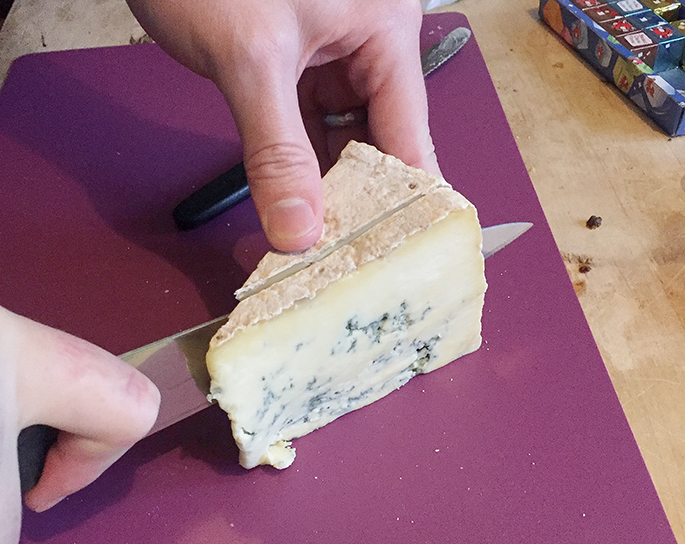
(Remember to wipe the knife in between cutting different cheese to avoid cheese cross contamination).
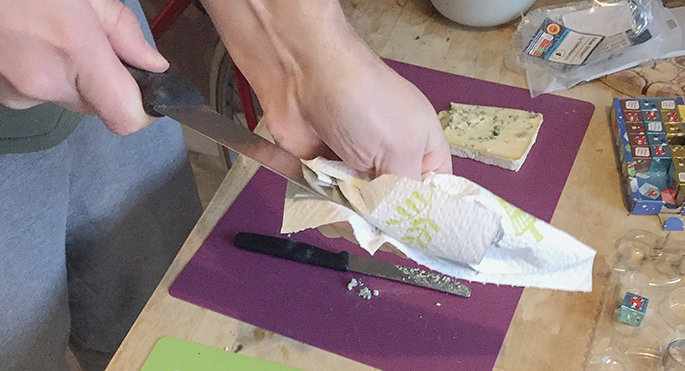
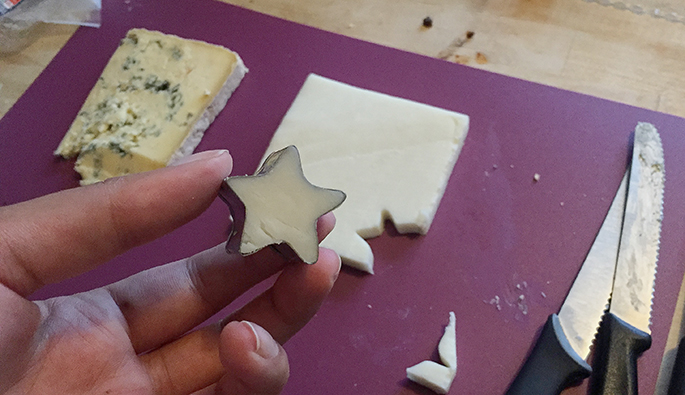
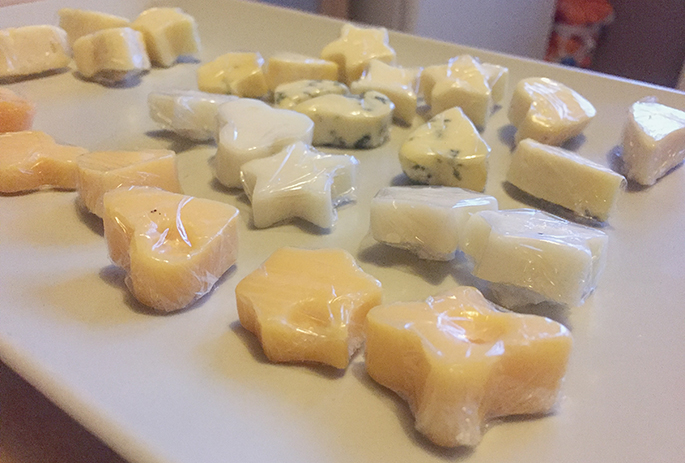
Then get cutting! Here was our first star, cut from the Goats’ Cheese.
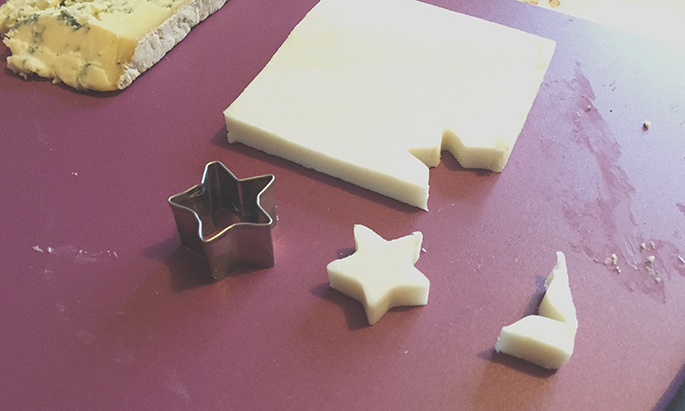
Repeat. 23 times.
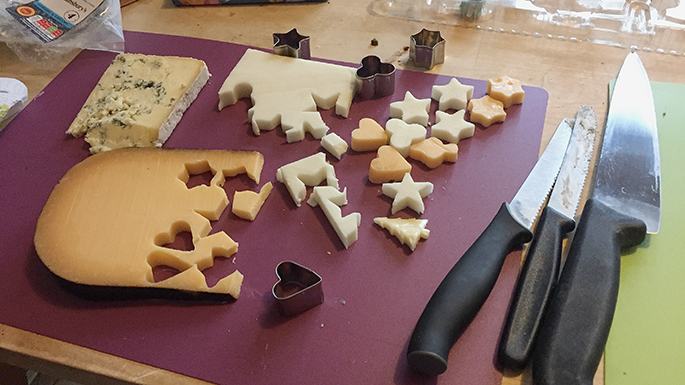

The Blue Stilton is the hardest one to mold since it’s so crumbly – so give it a good squish before popping out and try a simpler shape rather than a detailed star.
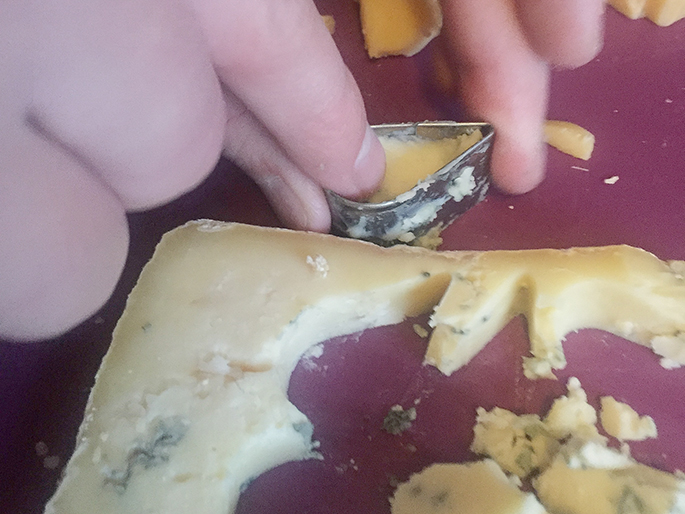
Now for the Smoked German’s turn:
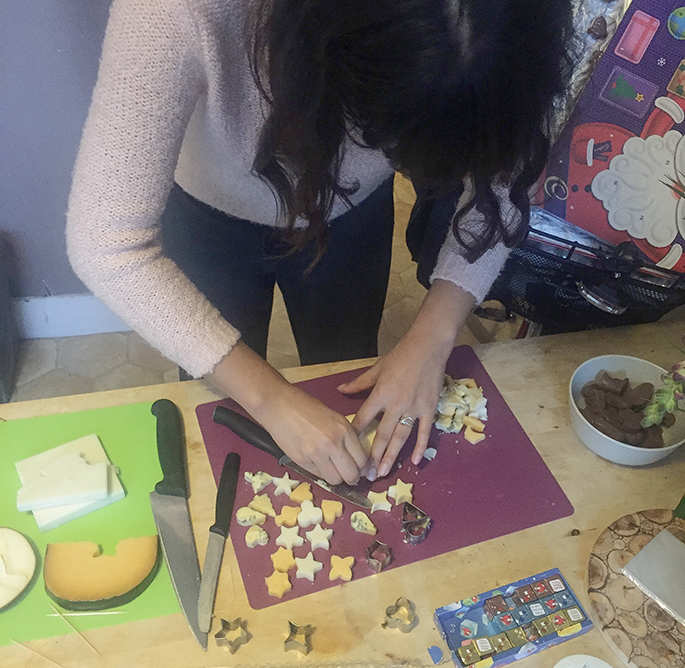
This takes a bit of a time, but there’s something oddly therapeutic about cutting delicious cheese into pretty little shapes and shoving any excess into your mouth as you go along.
And TA-DAAAA. Here we have it. 24 (plus extras) perfectly fun looking cheese shapes, better than any chocolate selection I’ve ever seen.
Now, here’s the important part: How to keep the cheese fresh and prevent it from drying out.
Cling film to the rescue!
This where it becomes a two person job, since I always end up screwing up the cling film and getting frustrated with it for sticking onto my hand.
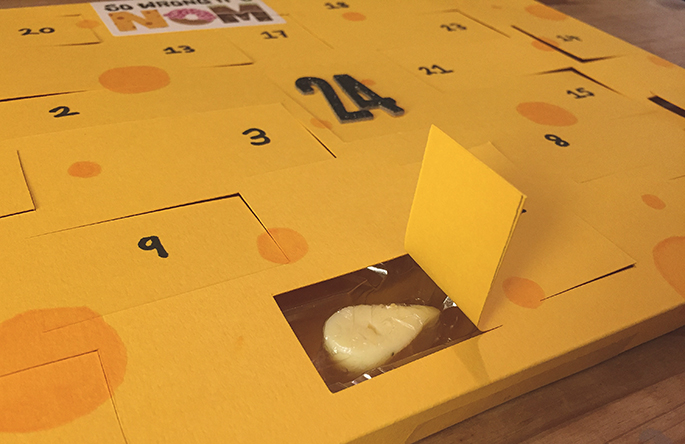
Cut out a strip of cling film, then cut it in half so you have lots of little quarters. Then pop a little cheese into the middle and wrap!
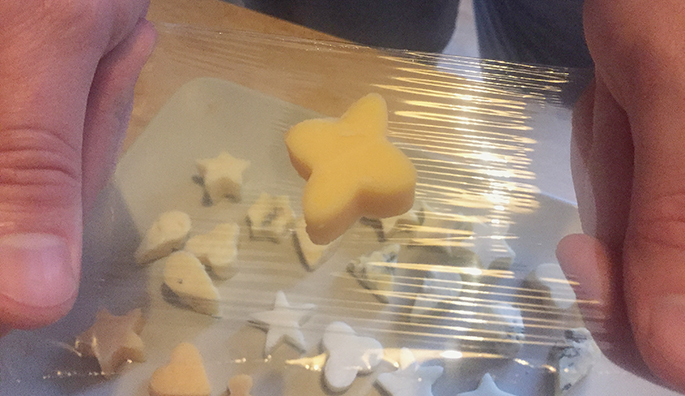
Make sure you get properly into the sides of the shapes so it’s as air tight as possible.

Voila. Perfectly wrapped up cheese delights.
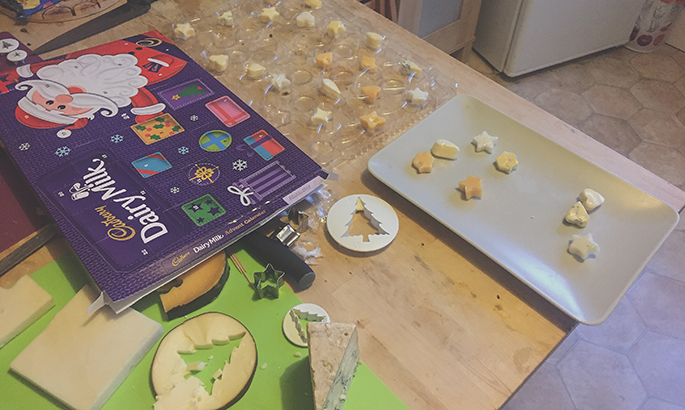
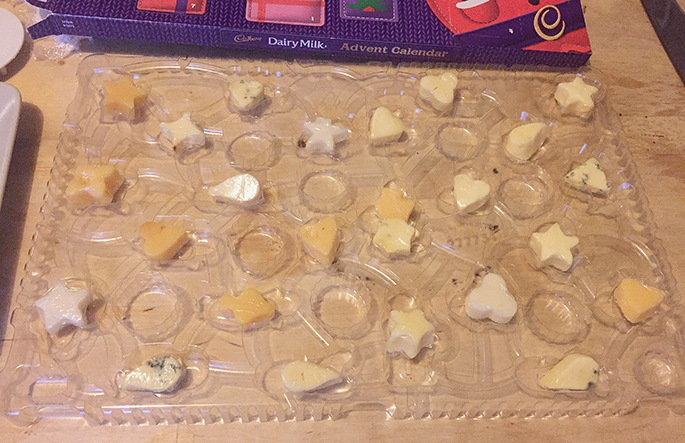
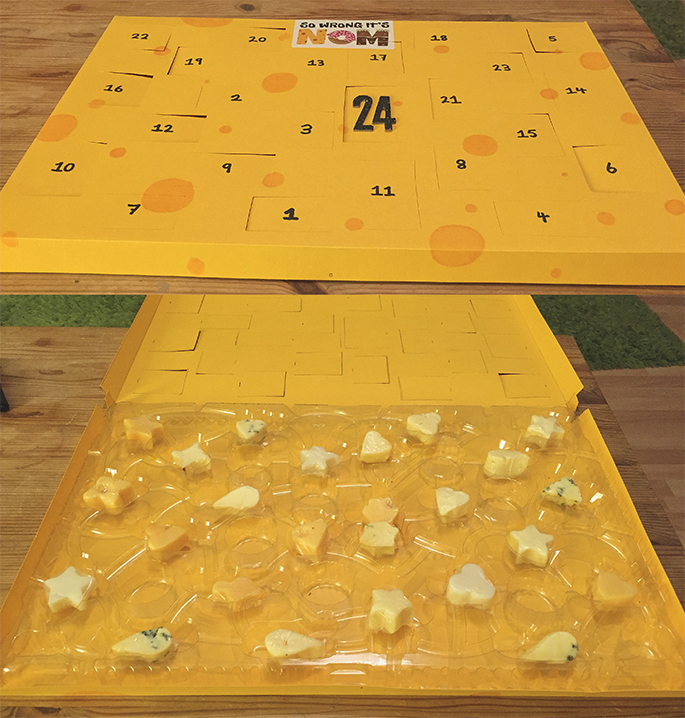
Pop the shapes back into the plastic tray, adding double cheese for Christmas Eve!
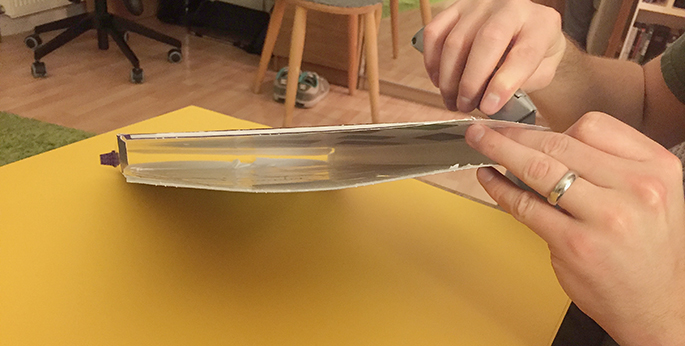
Making the cheese advent calendar box
Set the cheese aside (or in the fridge for now) and move onto the crafty part. The making of the box!
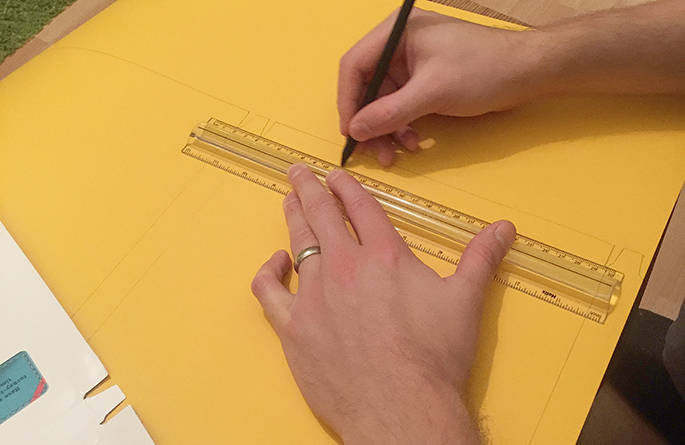
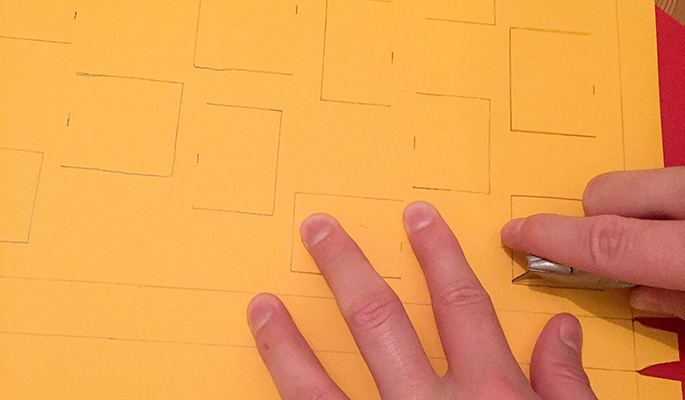
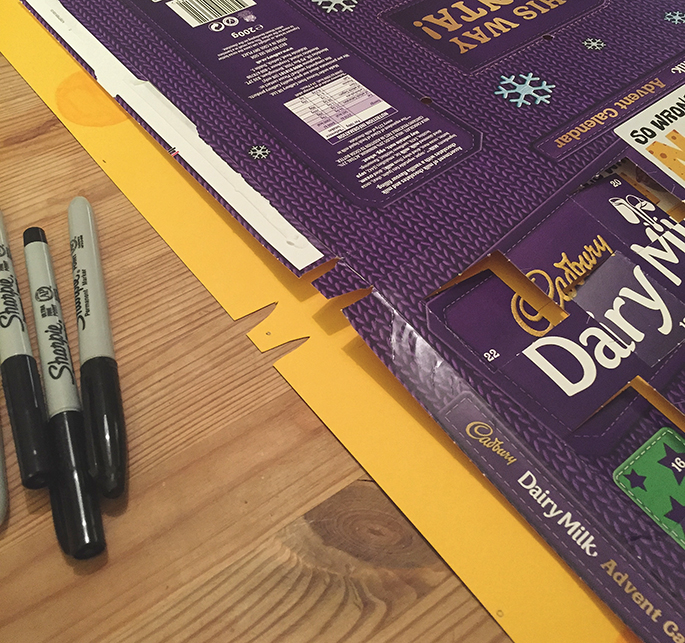
Using a stanley knife, neatly as you can open up the box where it’s sealed so you can put it flat.
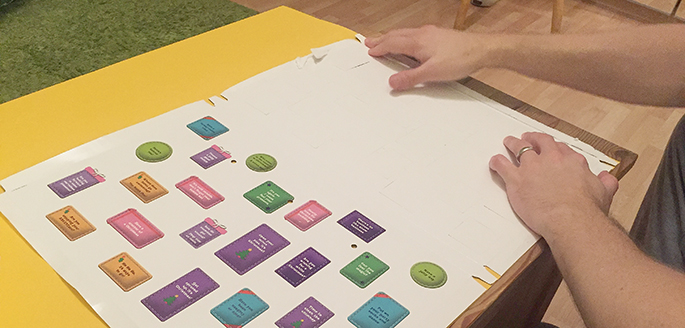
Now, making sure that it’s straight and lined up – draw round the edges like so.
Connect all the lines where the flaps are folded.
Put the template back over and draw round where the boxes go.
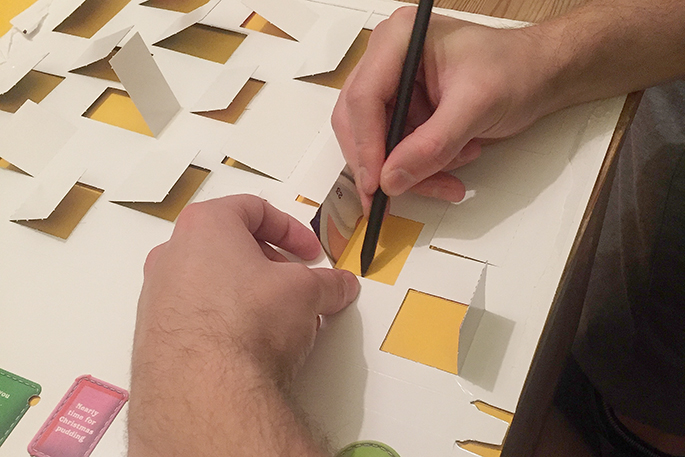
We only did 3 sides of the squares, to allow for one side to be a flap.
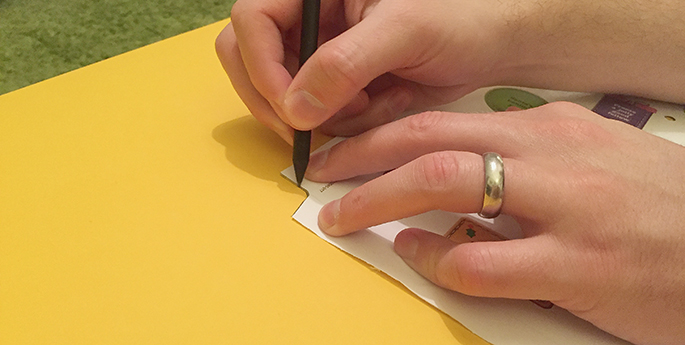
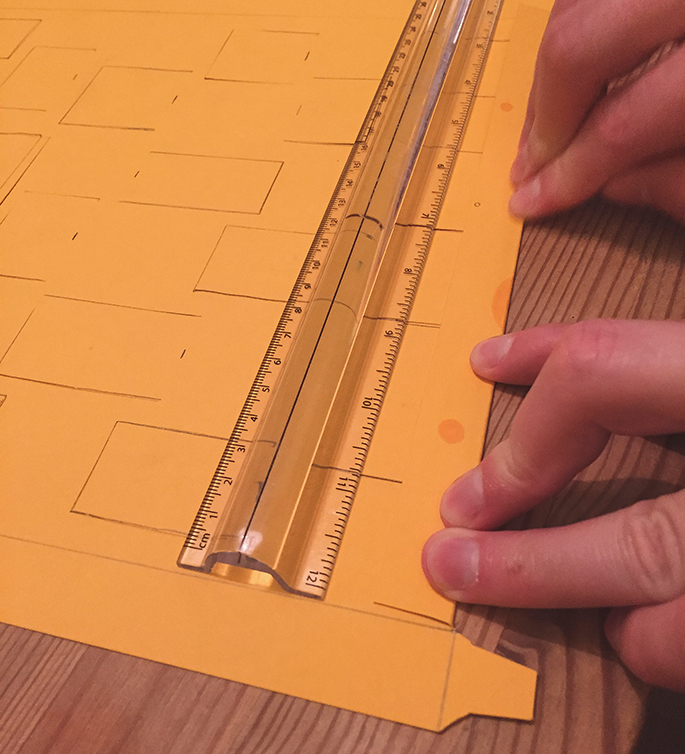
Before you start the cutting stage, make sure you get a chopping board! Cheese advent calendars are nice and stuff, but so is an unscratched table.
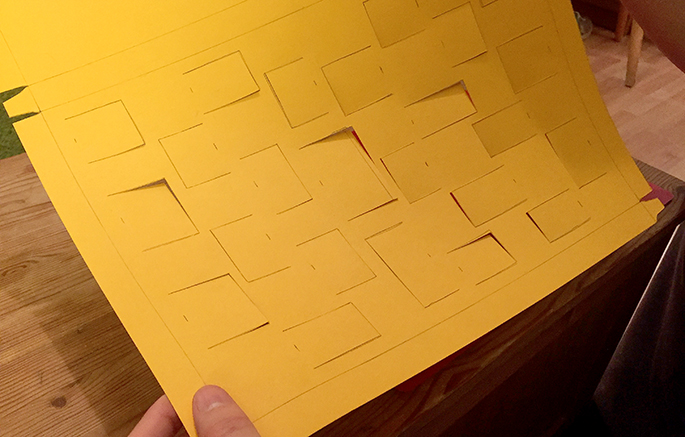
Carefully cut around the small flaps, using a ruler to help you with the longer lines.
Then cut round 3 sides of the boxes.
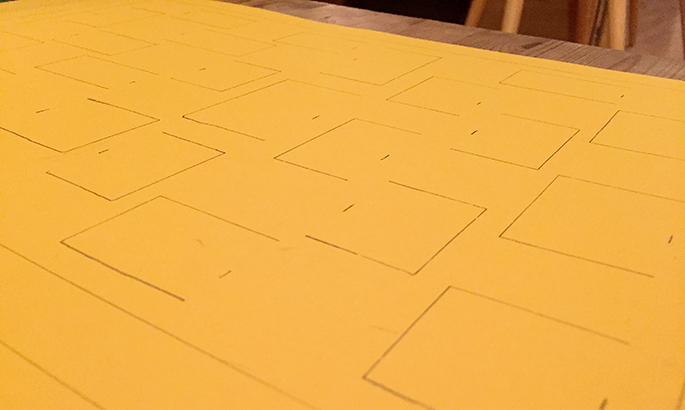
And you should end up with something like this.
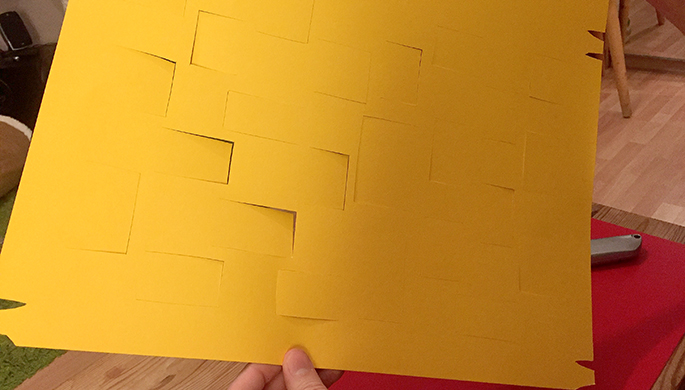
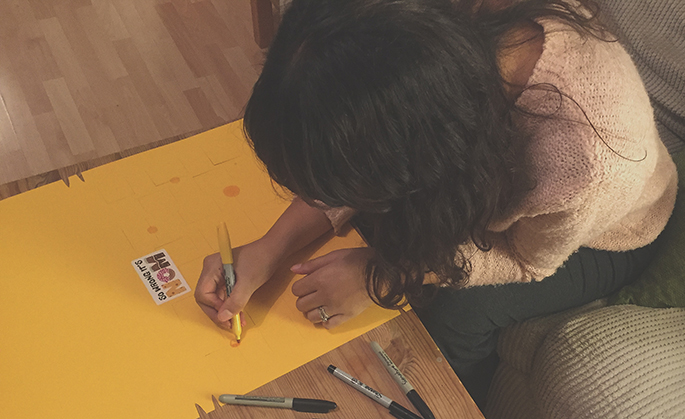
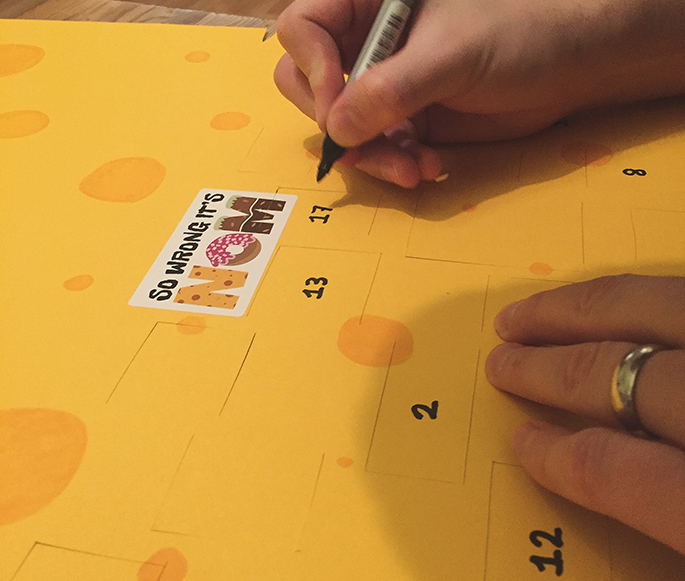
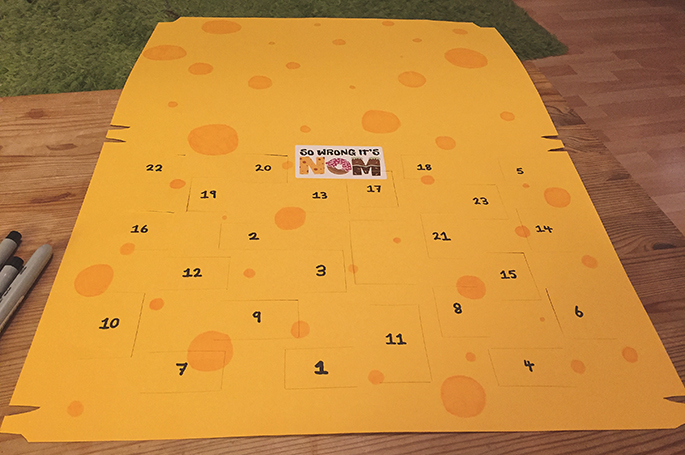
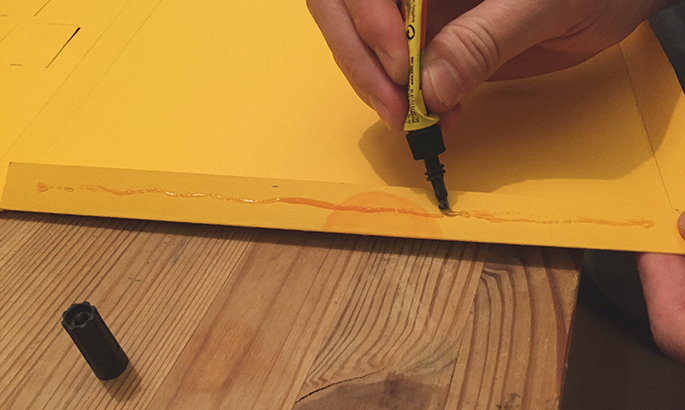
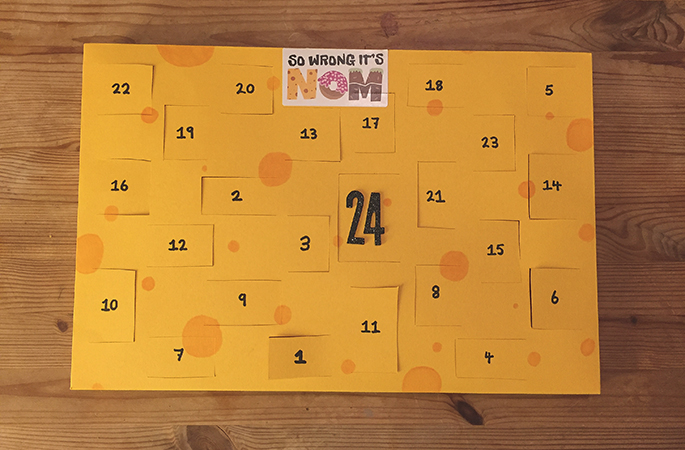
Now you can move onto decorating! Hurrah! Now, feel free to go with whatever design your heart desires as well as choosing your own colour card. I wanted to go for a giant cheese theme for mine, hence the yellow card.
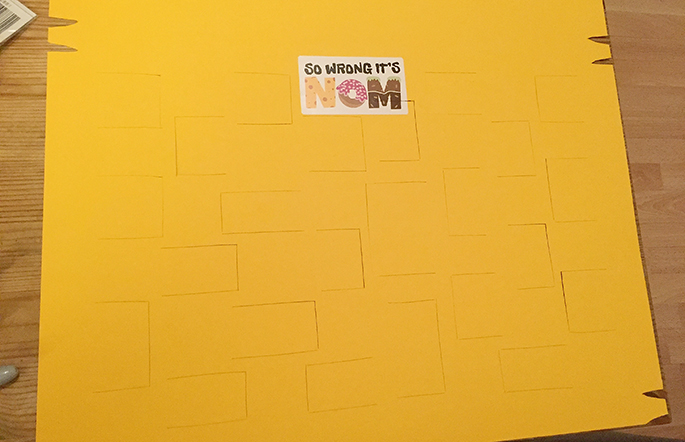
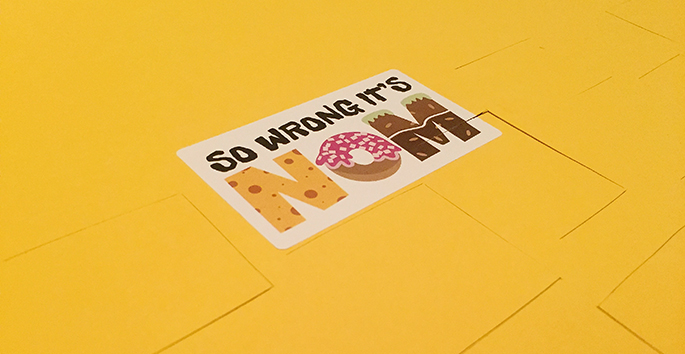
I started by drawing lots of cheese holes on my cheese, because – well, cheese.
Definitely get the decorating out of the way whilst it’s a flat box so you can lean on a table and not have to worry about bending your creation.

Then, the numbers begin. Use the old chocolate advent calendar as a guide to which numbers go where.
Slowly getting there…
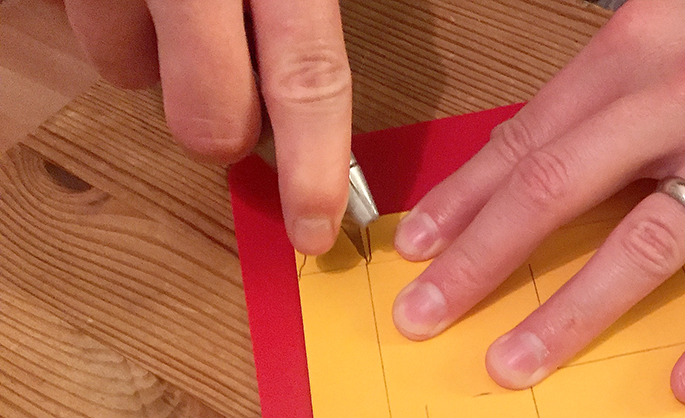
Save yourself some confusion by marking the flaps that are folded inwards (therefore glued on) with a (-). If it will be visible, mark it with a (o). Anyone who has done sewing before will totally get why this small step can make a big difference.
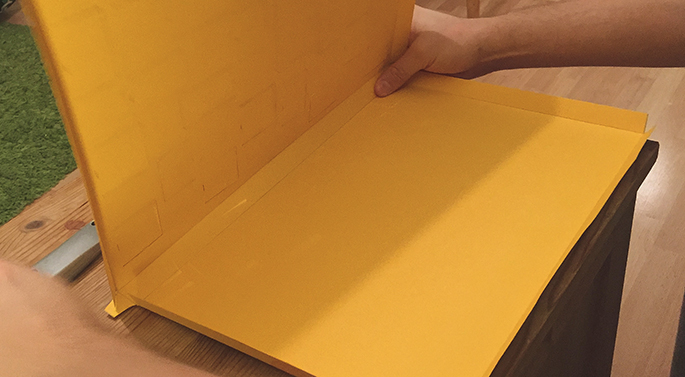
So now get folding. Remember, if you get stuck just refer back to the chocolate advent calendar and copy that. You’re folding everything inwards.
And so it begins to look like a box!
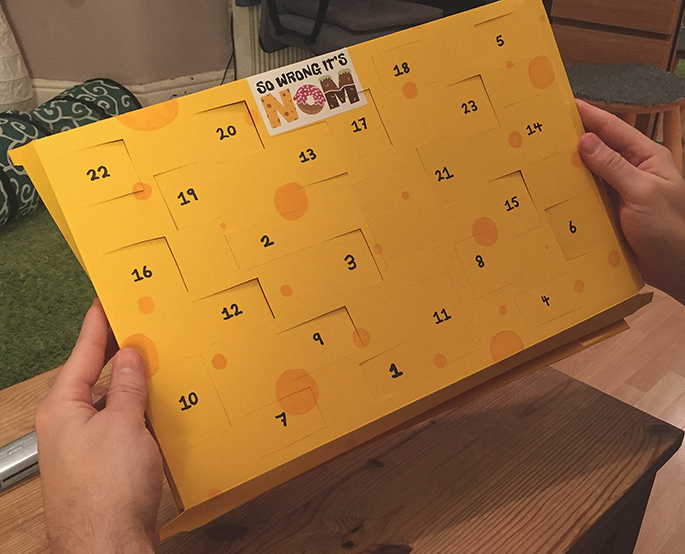
We bought big stickers from Hobbycraft to make Christmas Eve stand out.

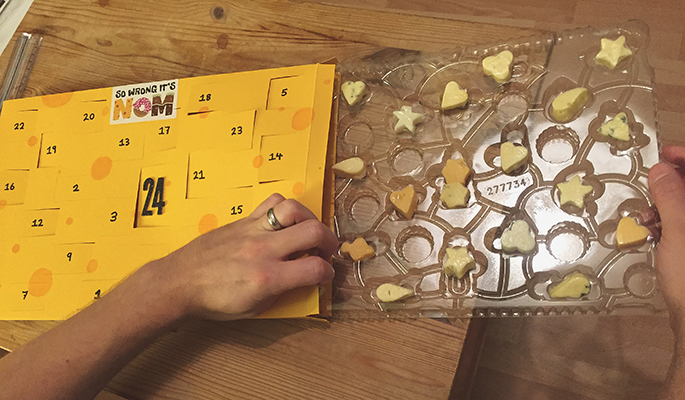
Make sure you test that the tray fits and everything is A-okay!
Find some glue (if you don’t have any, Sellotape is fine.) Stick it all together and let it dry for 5/10 minutes.
Pop the cheese tray back inside and get excited about getting to the end of your project….
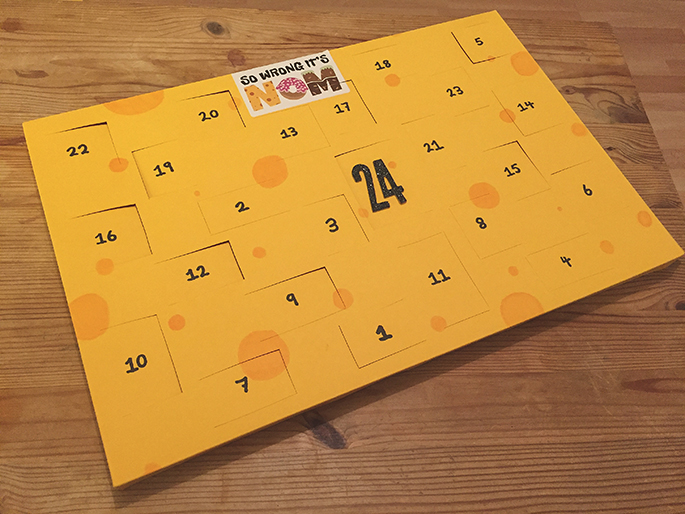
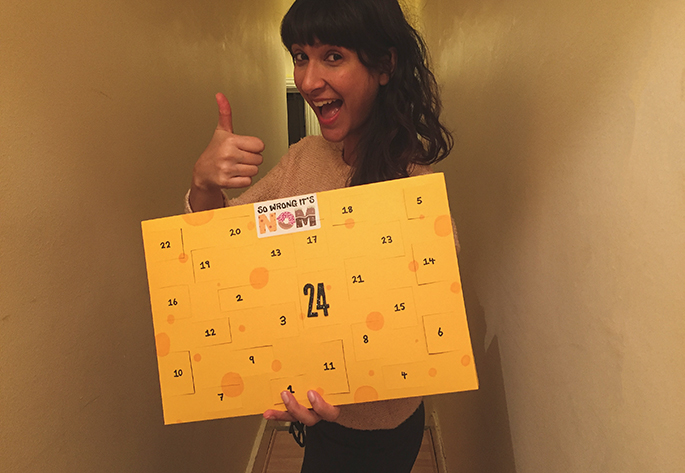
….AND WE’RE DONE! Look at this beautiful giant cheesy thing of beauty.
Now you’ve got the instructions to make your very own, but if you can’t be bothered you can follow me on Instagram (SoWrongItsNom) and vicariously enjoy as I open up each day.
Here’s a sneak peek of day 1!

If you do decide to make your own Cheese Advent Calendar, please Tweet me @SoWrongItsNom a picture of your creation and leave a comment below!
Merry Cheesemas!
[…] up of waiting for the likes of Babybel and Cathedral City to get their act together, So Wrong It’s Nom food blogger Annem Hobson decided to make her own. And she’s helpfully shared how to do it […]
[…] adult of watchful for a likes of Babybel and Cathedral City to get their act together, So Wrong It’s Nom food blogger Annem Hobson motionless to make her own. And she’s willingly common how to do it […]
[…] adult of watchful for a likes of Babybel and Cathedral City to get their act together, So Wrong It’s Nom food blogger Annem Hobson motionless to make her own. And she’s willingly common how to do it […]
[…] up of waiting for the likes of Babybel and Cathedral City to get hold of their act together, So Wrong It’s Nom meals blogger Annem Hobson decided to make her own. And she’s helpfully shared exactly how to do […]
[…] Last year, Hobson decided to create her own cheese advent calendar – and she even went as far as teaching others how to do so (here’s the tutorial). […]
[…] Last year, Hobson decided to create her own cheese advent calendar – and she even went as far as teaching others how to do so (here’s the tutorial). […]
[…] You can make it yourself too, courtesy of an instructional post by London-based Annem Hobson in her food blog So Wrong Its Nom. […]
[…] You can make it yourself too, courtesy of an instructional post by London-based Annem Hobson in her food blog So Wrong Its Nom. […]
[…] You can make it yourself too, courtesy of an instructional post by London-based Annem Hobson in her food blog So Wrong Its Nom. […]
[…] You can make it yourself too, courtesy of an instructional post by London-based Annem Hobson in her food blog So Wrong Its Nom. […]
[…] You can make it yourself too, courtesy of an instructional post by London-based Annem Hobson in her food blog So Wrong Its Nom. […]
[…] You can make it yourself too, courtesy of an instructional post by London-based Annem Hobson in her food blog So Wrong Its Nom. […]
[…] You can make it yourself too, courtesy of an instructional post by London-based Annem Hobson in her food blog So Wrong Its Nom. […]
[…] You can make it yourself too, courtesy of an instructional post by London-based Annem Hobson in her food blog So Wrong Its Nom. […]
[…] You can make it yourself too, courtesy of an instructional post by London-based Annem Hobson in her food blog So Wrong Its Nom. […]
[…] You can make it yourself too, courtesy of an instructional post by London-based Annem Hobson in her food blog So Wrong Its Nom. […]
[…] You can make it yourself too, courtesy of an instructional post by London-based Annem Hobson in her food blog So Wrong Its Nom. […]
[…] You can make it yourself too, courtesy of an instructional post by London-based Annem Hobson in her food blog So Wrong Its Nom. […]
[…] You can make it yourself too, courtesy of an instructional post by London-based Annem Hobson in her food blog So Wrong Its Nom. […]
[…] You can make it yourself too, courtesy of an instructional post by London-based Annem Hobson in her food blog So Wrong Its Nom. […]
[…] You can make it yourself too, courtesy of an instructional post by London-based Annem Hobson in her food blog So Wrong Its Nom. […]
[…] You can make it yourself too, courtesy of an instructional post by London-based Annem Hobson in her food blog So Wrong Its Nom. […]
[…] You can make it yourself too, courtesy of an instructional post by London-based Annem Hobson in her food blog So Wrong Its Nom. […]
[…] You can make it yourself too, courtesy of an instructional post by London-based Annem Hobson in her food blog So Wrong Its Nom. […]
[…] jeune femme anglaise à la tête du blog sowrongitsnom a par exemple eu l’idée de créer un calendrier de l’Avent au fromage. Dans ce […]
[…] no paramos de preguntarnos ¿por qué? ¿Cómo es que a nadie se le había pasado por la cabeza? ‘The Worl’s First Cheese Advent Calendar’, o lo que es lo mismo el primer calendario de Adviento de queso del mundo, acaba de crearnos una […]
[…] AND, she’s been kind enough to provide DIY instructions to make your own >> So Wrong Its Nom. […]
[…] got a lot of attention last year when she shared details of how she created her own cheese advent calendar, with 24 individually-wrapped cheese pieces – including stilton, goats’ cheese and […]
[…] So Wrong It’s Nom. She came up with the idea last year, and she was even kind enough to share the instructions on her website so you too can make your own. Which is probably what you’ll have to do for […]
[…] So Wrong It’s Nom. She came up with the idea last year, and she was even kind enough to share the instructions on her website so you too can make your own. Which is probably what you’ll have to do for […]
[…] So Wrong It’s Nom. She came up with the idea last year, and she was even kind enough to share the instructions on her website so you too can make your own. Which is probably what you’ll have to do for […]
[…] So Wrong It’s Nom. She came up with the idea last year, and she was even kind enough to share the instructions on her website so you too can make your own. Which is probably what you’ll have to do for […]
[…] So Wrong It’s Nom. She came up with the idea last year, and she was even kind enough to share the instructions on her website so you too can make your own. Which is probably what you’ll have to do for […]
[…] So Wrong It’s Nom. She came up with the idea last year, and she was even kind enough to share the instructions on her website so you too can make your own. Which is probably what you’ll have to do for […]
[…] called So Wrong It’s Nom. She came up with the idea last year, and she was even kind enough to share the instructions on her website so you too can make your own. Which is probably what you’ll have to do for this […]
[…] a meantime, she’s put adult detailed instructions on how to make your possess for a cheese-connoisseurs who only can’t wait. Happy […]
[…] until 2017, but good news is you can make your own in the meantime by following the instructions here or register your interest to pre-order your 2017 version […]
[…] So Wrong It’s Nom. She came up with the idea last year, and she was even kind enough to share the instructions on her website so you too can make your own. Which is probably what you’ll have to do for […]
[…] So Wrong It’s Nom. She came up with the idea last year, and she was even kind enough to share the instructions on her website so you too can make your own. Which is probably what you’ll have to do for […]
[…] called So Wrong It’s Nom. She came up with the idea last year, and she was even kind enough to share the instructions on her website so you too can make your own. Which is probably what you’ll have to do for this […]
[…] called So Wrong It’s Nom. She came up with the idea last year, and she was even kind enough to share the instructions on her website so you too can make your own. Which is probably what you’ll have to do for this […]
[…] So Wrong It’s Nom. She came up with the idea last year, and she was even kind enough to share the instructions on her website so you too can make your own. Which is probably what you’ll have to do for […]
[…] called So Wrong It’s Nom. She came up with the idea last year, and she was even kind enough to share the instructions on her website so you too can make your own. Which is probably what you’ll have to do for this […]
[…] So Wrong It’s Nom. She came up with the idea last year, and she was even kind enough to share the instructions on her website so you too can make your own. Which is probably what you’ll have to do for […]
[…] par Annem Hobson, une passionnée de fromage vivant à Londres et blogueuse sur le site So Wrong It’s Nom, ce calendrier est composé de 24 bouts de fromages découpés à la manière des chocolats, en […]
[…] So Wrong It’s Nom. She came up with the idea last year, and she was even kind enough to share the instructions on her website so you too can make your own. Which is probably what you’ll have to do for […]
[…] there’s only one prototype at the moment, but instructions are available to make your own (I highly suggest making a second version filled with Lactaid). A retail version […]
[…] tan mal su NOM. Ella subió con la idea el año pasado, y ella tuvo incluso que suficiente para compartir las instrucciones en su página web para que usted también puede hacer su propia. Que es probablemente lo que […]
[…] If you are a cheese connoisseur and cannot wait to get your hands on one until Christmas 2017, she has a step-by-step guide on how to make it. […]
[…] Annem Hobson, the London-based blogger behind So Wrong It’s Nom, created the most amazing cheese Advent calendar that allows you to count down to Christmas in the best way possible: by eating a different piece of […]
[…] Annem Hobson, the London-based blogger behind So Wrong It’s Nom, created the most amazing cheese Advent calendar that allows you to count down to Christmas in the best way possible: by eating a different piece of […]
[…] Hobson, a London-based food blogger, has created a cheese advent calendar that swaps chocolate for 24 days of stilton, goat cheese and […]
[…] Hobson, a London-based food blogger, has created a cheese advent calendar that swaps chocolate for 24 days of stilton, goat cheese and […]
[…] Hobson, a London-based food blogger, has created a cheese advent calendar that swaps chocolate for 24 days of stilton, goat cheese and […]
[…] Hobson, a London-based food blogger, has created a cheese advent calendar that swaps chocolate for 24 days of stilton, goat cheese and […]
[…] Hobson, a London-based food blogger, has created a cheese advent calendar that swaps chocolate for 24 days of stilton, goat cheese and […]
[…] Annem Hobson, the London-based blogger behind So Wrong It’s Nom, created the most amazing cheese Advent calendar that allows you to count down to Christmas in the best way possible: by eating a different piece of […]
[…] Hobson, a London-based food blogger, has created a cheese advent calendar that swaps chocolate for 24 days of stilton, goat cheese and […]
[…] Calendar – sorry, this year you have to make your own gourmet cheese calendar, but this lovely lady gives you step by step […]
[…] Hobson, a London-based food blogger, has created a cheese advent calendar that swaps chocolate for 24 days of stilton, goat cheese and […]
[…] become besties with food blogger Annem Hobson. The 27-year-old London resident has created the first-ever cheese advent calendar to count down until […]
[…] Pagal sowrongitsnom.com informaciją Daugiau informacijos, apie sūrio Advento kalendoriaus pasigaminimą, galite rasti čia: […]
[…] Annem Hobson, a London-based blogger behind So Wrong It’s Nom, combined a many extraordinary cheese Advent calendar that allows we to count down to Christmas in a best approach possible: by eating a opposite square […]
[…] zijn helaas hopeloos uitverkocht, maar Annem heeft zo’n groot hart dat ze ons gewoon een how to-gids cadeau geeft. Santa, is that you? En voor de ongeduldigaards en luieriken, hier kan je al een […]
[…] o calendário a partir do ano que vem. Mas enquanto isso, ela disponibilizou em seu blog um passo a passo para você ter um calendário de queijo para chamar de seu. Como ninguém pensou nisso […]
[…] the London-based mostly blogger behind So Wrong It’s Nom, created probably the most superb cheese Advent calendar that permits you to rely right down to Christmas in the easiest way attainable: by consuming a […]
[…] ella escribe en su blog, So Wrong it’s Nom, “Me encanta el queso. Tanto que me atrevería a decir que más que el chocolate, así que, ¿por […]
[…] ihrem Blog So Wrong it’s Nom gibt sie sogar eine Anleitung, wie du dir einen solchen Kalender selbst basteln […]
[…] will be sold to the public in 2017. However, this DIY post made by Annem provides you with a step-by-step tutorial that shows you how to make a cheese advent calendar in the comfort of your own kitchen. It seems […]
[…] cheese blogger (yep, that’s a thing) Annem Hobson came up with the idea, offering instructions on how to make your own brie-lliant calendar last […]
[…] A DIY cheese advent calendar by Annem Hobson of food blog So Wrong It’s Nom has become a social media sensation. It garnered so much buzz that Hobson is planning to put the calendars into production next year. Follow her step-by-step instructions to make a truly personalized gift for your favorite caseophile—or sign up to pre-order one for 2017. […]
[…] cheese fanatic Annem Hobson will teach you how to make your own #CheeseNotChoc advent calendar here. Make sure to register your interest in the cheese advent calendar on their official page to make […]
[…] How to make a cheese advent calendar! via So Wrong It’s Nom […]
[…] Hobson, a London-based food blogger, has created a cheese advent calendar that swaps chocolate for 24 days of stilton, goat cheese and […]
[…] cheese blogger (yep, that’s a thing) Annem Hobson came up with the idea, offering instructions on how to make your own brie-lliant calendar last […]
[…] concept se le ocurrió el año pasado, cuando compartió en su weblog estas instrucciones de cómo hacer un calendario de […]
[…] idea se le ocurrió el año pasado, cuando compartió en su blog estas instrucciones de cómo hacer un calendario de […]
[…] idea se le ocurrió el año pasado, cuando compartió en su blog estas instrucciones de cómo hacer un calendario de […]
[…] idea se le ocurrió el año pasado, cuando compartió en su blog estas instrucciones de cómo hacer un calendario de […]
[…] cheese blogger (yep, that’s a thing) Annem Hobson came up with the idea, offering instructions on how to make your own brie-lliant calendar last […]
[…] cheese blogger (yep, that’s a thing) Annem Hobson came up with the idea, offering instructions on how to make your own brie-lliant calendar last […]
[…] cheese blogger (yep, that’s a thing) Annem Hobson came up with the idea, offering instructions on how to make your own brie-lliant calendar last […]
[…] & if you want one right now it’s pretty easy for you to make by yourself, just get some cheese and get yourself a calendar! Find out how to make one HERE! […]
[…] So Wrong It’s Nom. She came up with the idea last year, and she was even kind enough to share the instructions on her website so you too can make your own. Which is probably what you’ll have to do for […]
[…] will go on sale in Asda stores on Monday, November 6 – or you can learn how to make your own here […]
[…] I’m learning as I go along and hearing directly from you never goes unnoticed. Remember, here’s instructions to make your own […]
[…] hecho, fue Annem Hobson, directora de este portal, quien tuvo la idea. Ya desarrolló un primer prototipo en 2016 de forma manual y, ante el éxito que obtuvo, comenzó a trabajar para llegar a comercializarlo. Ahora, su deseo al […]
[…] put the calendar together, and it looks like quite a process. You can check out her cheesy journey here. But, the most pressing question you’re surely asking right now is, “How do I get my […]
[…] Advent Calendar is currently only available in the UK, but committed cheese lovers can use this DIY Cheese Advent Calendar tutorial at So Wrong It’s Nom to make their own. (Fun fact: It’s what actually […]
[…] pueda inspirar para hacer vuestro propio calendario, podéis acceder al blog de Annem a través de este enlace. En el mismo post podréis leer más detalles sobre el calendario de queso de Asda, para quienes […]
[…] So Wrong It's Nom […]
[…] Cheese Advent Calendar started as a seed of an idea a few years ago, and after a lot of hard work we had a sell out launch exclusively with Asda in […]